
This week's theme is "Orange/Warmth"
I took this picture at Ort Farms in Long Valley, NJ a couple weekends ago. I wasn't crazy about it until I added some texture to it, and it grew on me.


Haze Tutorial (sort of)
I found a great way to add haze to a photo. So simple too & I need to share it with you here.
I found this tutorial over at Polished Picture which I love.
In the past, to achieve a haze, I was adding a gradient layer or solid color layer then applying a filter. It works ok that way, but this new way is much better!
So here's my SOOC shot - kind of dark.
The exposure didn't pick up the wonderful backlight we had that evening.

Here is the shot after I brightened it up a bit in Lightroom

I opened the picture with Photoshop Elements (you can do the same with Photoshop).
Then, I created a "Levels" Adjustment layer and slid the little black triangle to adjust.

I moved the little black triangle slider below to the right. As you move it, the "Output level" will count higher. It starts at "0" and goes higher as you move it. I stopped at around '32' for this picture. You will see how it adds instant haze as you slide to the right. 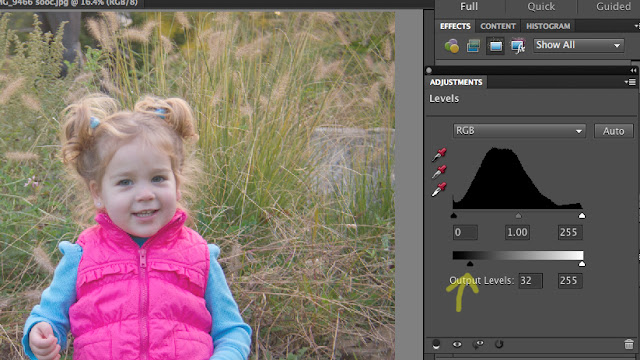

I then masked out her face with a soft brush at about 20% opacity to make her eyes pop back out -
I added a warming photo filter & slightly sharpened.
I also ran the "Golden Afternoon" action from Coffeeshop Blog & dropped it to about 20% opacity and masked out her face as well.
I love this action for early evening shots!
Here is the finished product. It has some haze & her face still pops out nicely.
Maybe it's a little too golden for some tastes or too hazy - but it's fun to experiment.

Looks good. I really need to invest in better photo editing software. I feel like Gimp is really limiting. You have to take a lot of extra steps to get what you want. Of course, Gimp is free, so there is that benefit. ha. Maybe of next Christmas I can get Photoshop. I really do love the finished picture of Julianna! I can't believe the progress you've made with photography and self instruction. Props!
ReplyDeletethanks kim! You should try photoshop elements, it's like photoshop light and 1/5 of the price. I got PSE for under $100 and you can get a 30 trial to see if you even like it first.... that sold me! :) Good luck if you do decide to go with it - it's a great tool! It turned me into psycho editor! haha
DeleteLove the pumpkin shot and the texture. Well done!
ReplyDeleteI am in love with that pumpkin photo!! I love the perspective of the shot and the contrast of the orange pumpkins on the white fence! Great texture work too. Great tutorial. I love playing around in Photoshop. Its really amazing how it can improve a photo.
ReplyDeleteNice perspective on your pumpkin photo!
ReplyDeleteNice use of texture! :) Thanks for joining us in the Nurture Photography Challenge. Can't wait to see what you come up with for Friday's new theme: red/foliage. :)
ReplyDeleteLove this. What a difference a few edits can make. Going to try your haze tutorial soon.
ReplyDelete